If
java disabled or no main menu showing above - use links
below.
|
|
Image
Basics -
There may be some of you who
have thus far had no particular interest in looking
at the make-up and construction of images but perhaps
wish now to learn a little more. The examples shown
below are used to help illustrate the essence of the
subject and I have tried to include enough material
to give at least some idea, without trying to get too
deep - but maybe perhaps wet your appetite! |
We
should discuss image formats for completeness, but as
far as "The Web" is concerned, we are at the
moment only really concerned with .JPG ("jaypeg")
and .GIF ("Jiff"). Most image applications
have their own "save" format (eg. .PSD
extension in PhotoShop®"), able to store all
information on changes made and properties etc - but
ultimately, it is just these two we will cover, other
formats being used to create an image but the "save"
being to these formats. (You may have come across the
.PNG type too - this is in use and versatile
and may be used on the Web more in future, but file
sizes are for my liking too much on the large size).
The most basic format is BMP (bitmap) ..... here,
every pixel is saved ''as is' and there is no compression.
The file size stored is the same as file size in memory
when displayed (JPG for example, compressed 10:1
could be 10k stored but 100k in memory when displayed.).
BMP is of little use generally for web display
because of shere file size relative to image size! Don't
post Bit Maps!!
GIF is limited to 8 bit - 256 colors and has
some compression. One of its most useful attributes
is the ability to select one specific color and make
that transparent - very useful for use on web
pages. Furthermore ... it is possible to ''sequence''
a set of GIF images to make small animations
.... everyone is familiar with the smilies etc!! There
is a brief description of this on the animations
page , (opens new window).
For most of the sections we are using the .JPG
format which can compress the image, and these
have been saved using the highest resolution sampling/compression
algorithm, minimising color degradation. As a generalisation,
the .JPG format permits a large color range (up
to 16 million colors) and higher degrees of compression.
The .GIF format is based on a 256 color total,
and while versatile with regard to transparent colors
etc, is generally larger and less compressible then
.JPG.
Note - JPG is referred to as ''lossy''
compression, and if images are over compressed then
when viewed (decompressed) they will not return to as
they were. Typically, some losses are found in the colors
but most of all, edge definition can be degraded. When
viewed close in, it can appear that there is a lot of
''pixel spilling'' or ''ghosting'' ....... edges are
no longer clean. Take a look at JPG
Examples (new window) to see the effects of
compression when useful limits are exceeded.
Let's look closer at the digital image itself .......
|
|
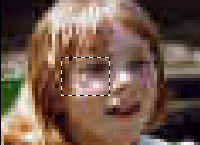
Starting
with a fairly ordinary "snapshot" type of
picture, reduced in size and compressed as far as I
dare without too much loss. Look at a higher
res' version if you wish.
Statistics - 200 x 145 pixels, 24 bit RGB color, 85K
in memory and 5K on disk (17:1 compression). Total pixel
count is 29,000 and original resolution was 240. Format
progressive .jpg with YUV 4,4,4 subsampling algorithm. |
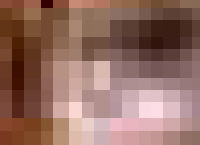
Let's
now have a look at the content of this at higher magnification
-
I am showing the image above, with a mask drawn around
the face area. This enclosed area in the mask is then
copied to the clipboard and pasted as a new image. It
is then enlarged back up to the 200 x 145 size, thus
magnifying the pixel structure - see pic' below for
the result.
|
|
|
Now we have
just the face area but magnified about three times.
Notice how "blocky" the image now appears.
This shows how necessary a lot of pixels, or "image
blocks" are to make a picture appear well defined.
By slightly squinting the eyes however, we can still
approximate to a recogniseable image and see what it
is. |
Taking the
previous and enlarged image - we again place a mask
and include just a small part containing an eye, cheek
and some hair.
Now we will further copy to the clipboard and again
pasting as a new image - with an enlargement to return
to a size of 200 x 145. See next picture for the result
of that.
|
|
|
We now have
a further magnication or enlargement of some 4 times.
From the original picture this represents a "blow-up"
factor of around 12.
This now is an all but unintelligible image - content
unknown, and is unuseable but shows clearly the make
up of pixels as color blocks within the image. |
To conclude,
here is a purposely "pixelized" version of
the original - whereby we have artificially decreased
resolution over the whole picture.
Again, a squinting view will almost approximate the
original but of course the fine detail is gone due to
not having enough pixels or "image blocks"
to spread all the details. This may help show how pixel
density relates to perceived quality.
|

|
|
This
is a very abreviated coverage of image construction
but should at least give some idea as to how pixel
density can affect the ability to resolve detail,
along with the relationship between pixels and file
sizes.
|
|
Back to Top
|