If
java disabled or no main menu showing above - use links
below.
|
|
Image
Tools -
When it comes to putting an image into a suitable software
application, in order to make changes and adjustments,
there are usually many paths open. In this section I
attempt to cover a few of the most common manipulations
and also give a few examples of more specific tools. |
|
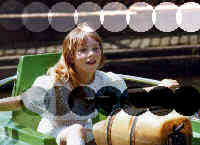
Again,
using our main image as an example, it is shown here
for reference and comparison.
As we go through various changes or manipulations on
this page, come back when necessary and compare with
this original, to help see the effects used. |
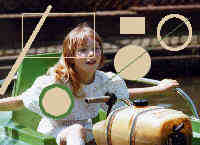
I have
split the first picture into top and bottom halves.
The top half has had an adjustment of +15% in both contast
and brightness. The lower half has received a -15% change
in both contrast and brightness.
Any given image can usually, after scanning, or to suit
taste, be "tweaked" to improve. |

|

|
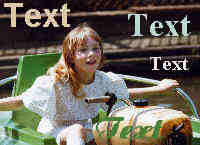
Saturation
- it is not particularly in need of an adjustment, but
I have again split it into top and bottom halves with
the changes.
Using a hue control tool, the top shows a purposely
extreme saturation increase of 50% - the lower half
has been reduced in saturation by 50% - leading to a
grey effect as color is "washed" out. |
Color balance
is very subjective. But we can make changes ......
Using a color balance tool and with a three way split,
we have an addition of, from top to bottom - +20% Red
& +20% contrast. Then in the middle we have +20%
Green and +20% contrast. Finally at the bottom there
is a +20% Blue and +20% contrast. All are exaggerated.
|
|
|
A useful
tool for retouching and removing of defects, is the
clone tool -
This example shows the target and source (with cross)
markers as they appear in use - and we have placed head
copies either side. The right is a 50% feathered version,
with softened edges, the left (with target circle) being
at zero feather and so an outer edge which is hard. |
Sometimes,
a small area within an image requires a degree of lightening
or darkening - usually only by a small amount.
Here, just as a demonstration of the tool, I have added
lightening and darkening circles ranging over 10% to
80% for each. This is purposely extreme. Feathering
here is zero - normally a degree of edge softening would
be necessary.
|
|
|
A shape
tool is often needed to draw squares, lines, circles
etc - with or without fills, and varying line thicknesses.
Here - a random selection of shapes and fills - the
fill and line colors used being taken from the image
itself by another useful tool - the "eyedropper"
color sampling tool. This can aid matching of colors
within the same image. |
Finally
for now - there is the simple text tool.
It is often necessary to overlay text on images - and
again, the use of the "eyedropper" sampling
tool will enable a color to be picked for the text,
that is already present in the original image. Font
choice is only limited by availability, and size of
course is chosen to suit taste and the application.
|
|
|
Most
software packages offer a vast array of tools, but
this covers just a few of the most useful and basic
examples you might use a lot and hopefully shows something
of the results of their use.
|
|
Back to Top
|