If
java disabled or no main menu showing above - use links
below.
|
|
| Following
on some elements discussed on other pages, just a few
basic points regarding the use of your scanner. Some
aspects regarding digital cameras may also be relevant,
plus some observations on printers. |
Scanning
-
Most scanners, at least the ''average'' priced ones
most 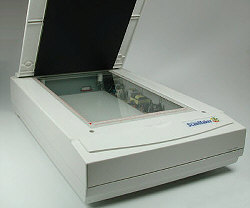 people
use at home, use a simple process of passing a light
source across the image and at the same time digitally
scanning each ''line'' of picture as it passes. people
use at home, use a simple process of passing a light
source across the image and at the same time digitally
scanning each ''line'' of picture as it passes.
Portions of each line are ''read'' as pixels by a CCD
(charge coupled device array) usually, and the number
of available sensing sections on this determines the
resolution available across the image. The motion of
the scan head equally affect resolution and in this
case, a stepper motor has to rapidly ''stop and start''
the required number of times every inch of travel.
The color value of each dot area (or pixel as it will
become) is determined by reading throughprime color
filters after being directed through a mirror array
- and the analogue levels are then translated into digital,
and thus binary values - and if ''full color'' has been
selected then this will usually be 24 bit (16 million
colors). If however ''grayscale'' had been selected,
then shades of black/white will be saved - usually as
8 bit for good gradation, or 4 bit for reduced tonal
values. ''Line art'' need only be theoretically 1 bit
... each pixel having a value of simply black or white.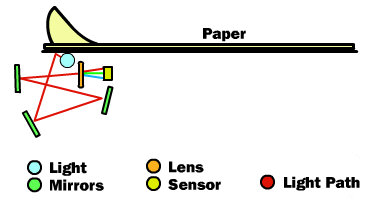
It is rare to find the real or ''optical'' performance
of these to be a lot better than 300 to 600 DPI ........
beyond that most make use of ''software interpolation''.
However, this is hardly a problem if you mostly scan
smallish prints, and as mentioned elsewhere, it is really
not necessary very often to scan at much in excess of
200 DPI anyways. Even at this resolution, file sizes
get larger quickly!!
The one situation where very high resolution is useful,
is if you need to scan a negative (say 35mm ... 1"
x 1 1/2") - then of course you are going to want
a considerable degree of enlargement. Say we wanted
to increase this to a size that will ''physically''
print at 6" x 3", then that is a 6 times increase.
If we require for example a minimum resolution of 100
DPI on the finished, enlarged image, then we will have
to scan at 600 DPI and when we enlarge, it will become
effectively 100 DPI.
Note however - working with film original material
requires a dedicated unit using transmitted light instead
of reflected. |
|
Considerations
-
Always try if you can to decide in advance what
you require from your image scan. Is it only for
web use??? If so then resolution can be kept lower.
In many cases 75 DPI will suffice but it should
be noted that JPG compression of this low resolution
will cause losses very quickly. I favor often scanning
at 200 and pre-cropping so I only get the picture,
and not the whole potential size of the scanner
bed. I can also, on my scanners, choose to enlarge
or reduce at this stage too - remembering of course
what this does to the final resolution.
200 DPI scans will compress down further and often
get close in final file size to a less compressed
75 DPI ..... and so in many cases look better. The
more pixel density there is, the less obvious the
effects of compression.
Remember ...... many is the time the resolution
of your original material is not all that high ...
to scan that at a higher res than needed is wasteful
... on file size and scanning time.
''Best descreening'' is something many scanners
offer ....... what is it? This is a method used
to help minimize those annoying interference patterns
you sometimes get from scans of magazine pictures
for example. They will probably be made up of a
''dot matrix'' (half tone) and if this is at a similar
''pitch'' or frequency to the scanning rate, then
you will see a pattern, akin to ''Moiré''
patterns. Often the scanner still cannot cope and
then it is best to experiment with different scan
resolutions ... one will usually be obviously much
better than the rest.
Scanner light sources - these are usually very slim
fluorescent tubes with a high color temperature
(''cold'), to approximate daylight. They have a
finite life and I would always suggest switching
the unit off between sessions to extend the life.
Anyone considering a scanner and not having had
one before, I can recommend getting if you can,
a SCSI version. If you already have a SCSI card
in your PC then that is ideal, but, many come with
a small dedicated SCSI card too. Data transfer is
faster with this and, unlike with Parallel port
models (was more usual) you will not have to have
the potentials problems sometimes encountered from
a shared printer port.
Now though with USB 2, serial connection is much
more acceptable, giving 1.5/12/480 Mbps. Many scannersand
printers are available now with this feature.
|
The
information above is only really an outline,
to try and give those less familiar with scanners
some idea of what they are about.
Printers after Scanning -
If you need to print after scanning, these
considerations are important .... covering
some of the aspects discussed above but also
needing further consideration. For those wanting
more information - it is available on a separate
page
|
|
Back to Top
|