If
java disabled or no main menu showing above - use links
below.
|
|
The
first pre requisite for achieving this is a camera -
of course!! Some people will still use film and need
to then scan prints to get their digital images. Scanning
is discussed on other pages.
Let's concentrate here though on digital camera approaches,
although for the most part the the techniques have great
commonality. |
|
Subject
Presentation -
This is very much up to you, the photographer! You
will have already probably seen some very creative
pictures on the board, with a firearm placed on a
pleasing background, and perhaps surrounded by assorted
paraphenalia, such as ammo, knives, loading accessories
...... etc. But it takes time!!
Ah
time! I make no excuses really for some of my rather
''iffy'' pic's .... they are usually taken ''spur of
moment'' ... with no time to really set up the ''studio''
environment properly as I might wish, added to which,
I try and reduce my material quite a bit. The size of
images is discussed on other pages.
What about your background? This is pretty much all
down to what you want but there are some category choices.
Many times an outdoor situation will be good if only
because of natural light ...... a picnic table with
nice wood grain figuring often looking good. Maybe too,
a ''hunting'' type setting, with leaves, and foliage
- useful for longarms perhaps.
For greatest control though indoors may give more scope
- and then almost any ''props'' can be used. It is useful
to have some rolls of cloth available .. fairly light
and neutral colors can work well .... but then too,
even a charcoal gray fleece is useful.
Even carpet and bed covers have their uses ...... it
is all down to your own imagination.
Do consider when you set out your gear, how you are
going to light it all ..... this is covered in the next
section below. |
|
Subject
Lighting -
Right, well - let's start out by saying that of all
lighting sources, the daylight is by far the best..
if not as controllable. However, take note .......
strong direct intense sunlight per se, is NOT the
best. Why? It promotes strong and deep shadows, and
may also produce strong and burned out highlights
from reflective areas on a gun.
Keyword all the way is - ''DIFFUSE'' lighting.
The
ideal conditions for daylight are when there is a
high and thin cloudbase .. which can give some very
useful and more diffuse light.
Shadows then will be evident but way softer.
If working indoors ...... you can make quite good
use of two or three tungsten light sources ... the
color temperature will be ''warm'' but that can sometimes
be an advantage and/or, corrected later.
Flash too is very useful (but beware unwanted reflections
on bright parts). I have a small slave flash which
fires from the camera flash. I set the latter to ''fill-in''
so it is very muted and then use the slave to one
side for my main light. Flash tho is by and large
not a first choice - much setting up needed and trial
shots too, to get ideal results. Note ... some cameras
produce a double flash and not all slave units work
with this unless designed so to do..... the first
flash is sometimes used to assess white level prior
to main exposure.
The simplest and maybe most useable approach is what
might be called ''main'' and ''fill'' ..... have a
light source (lamp or flash) in a position which gives
good illumination of the subject - probably from slightly
to one side and maybe quite high, then, a secondary
and less intense source that ''fills in'' the shadows
created by light source #1. Even a third source may
at times be useful to provide some degree of back
lighting.
Just a mention on ''White Balance'' ...... most cameras
can adjust automatically and do quite well. At times
though and if settings available, choose what works
best. Fluorescent lights can make for a green cast,
whereas tungsten makes things tend yellow. It is wise
to experiment a bit and find what gives you the results
you want.
Then though we have the ''light tent'' approach ..
see next section.
|
The
''Light Tent'' -
I kept this separate because I think
it is one of the most useful approaches
to this type of photography - but it
DOES take time and effort. As a freelance
many years ago - it was the only way
I could deal with things like jewelry,
leather goods etc.
The principle is simple and even without
a diagram .. just imagine this. You
have your subject/subjects on their
background and use something as a frame
over which you can drape a large white
sheet - this all but enclosing your
subject area. You provide light from
outside of that ... whether sun outdoors,
strong - multi point tungsten lighting
indoors ... or flash heads indoors.
You take the shots looking into this
''tent''.
The one thing it does so well ... is
diffuse the lighting such that highlights
and shadows are mellowed, and yet with
care over positioning, ''3D'' modelling
can still be very effective. I would
say to anyone starting ...... experiment.
You are not wasting film when shooting
digital!!
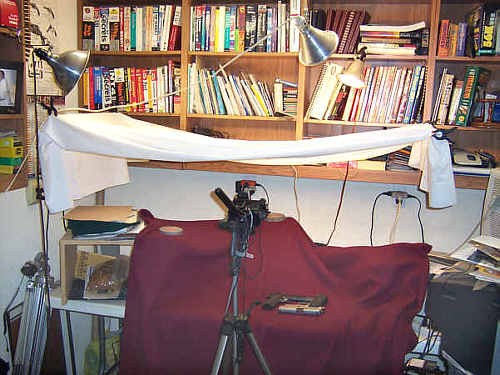
I am adding this at a late stage to further
assist with seeing this - and how simple
it can be! Below is my current absurdly
simple arrangement with a white sheet
draped above subject area. I have three
light sources and may use any or all -
sometimes also a white card to the side
to add slight fill-in. The camera (Minolta
DiIMAGE A1) is used on a tripod and all
settings are manual.
White balance is set up to suit lighting
and exposures are typically 1 sec or more,
at f11 with manual focus. I prefer background
material to be plain - pattern can I think
be too distractive, though other colors
can be used. Finishing work invariably
is needed to remove lint specks etc.
|
Actual
Shooting -
(NOT with ammo! The camera!)
Choose ''best'' for image quality.
Now, note this - and note it well ..... your biggest
enemy will be CAMERA SHAKE ...... unless
you can support the camera on something handy like
a small table ... use a tripod. Most digital cameras
seem not to have a shutter release cable facility
but ... if the button is used smoothly on a solid
tripod ... all should be well.
It is surprising how many people just as they press
the shutter button all the way - make the camera
itself move just a bit ..... and unless shutter
speeds are in the order of 1/125 plus on
standard lens setting .... and maybe 1/500
on full zoom .... it will degrade the sharpness.
These speeds are not usually available though to
choose.
Focus is usually now automatic ...... however, select
a focus setting that is well geared to letting the
camera ''see'' exactly the most critical part of
your subject matter, if available...... it might
mean changing over to a center zone setting in close-up
mode for example. And make sure that a ''half-way''
setting on the shutter button is used long enough
to let the focus ''set''........... before taking
the picture.
Exposure will by and large be automatic. This MAY
be Ok but ... if provision is made, you can set
things manually. I will not go into great detail
here re ''f'' stops and shutter speeds ... but there
is another
section which covers this in some detail.
However ..... some cameras do have a provision for
setting over or under exposure, as a deviation from
the metered norm .... it can help - experiment.
You may also have a setting where you can select
shutter or aperture priority ... this might help
some types of picture taking.
Study your camera's manual carefully. It is surprising
how many people say after weeks or months of using
their camera say .... ''oh, I didn't know it could
do that''!!
|
Image
After Treatment -
Other pages deal with various techniques for changing
image attributes and modifying but, before we
leave this section, let's just remind you of a
page giving an example of what I mean. ''Pre-posting''
image edits.
|
|
This
has barely scratched the surface!!
I do not claim to be the world's expert, at
all ... though as mentioned earlier, I did
work freelance years ago for a long time.
Used ''film'' in those days!! However this
is only intended as a guide to start people
off - and I do suggest quite a lot of experimentation.
At least with a digital camera you do not
waste film .... only time ... and when done,
reformat the memory and start over!
|
|
Back to Top
|